A brutal triple-roomed temple sees the player pitted against many ferocious bosses. The Lord of Shadow Valley, Lele, has an especially nasty surprise waiting for unprepared Knights...
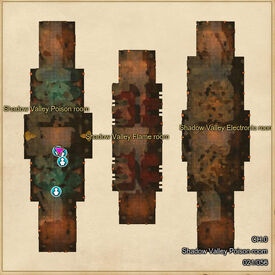
Map[]

Skalaris[]
Poison Room:
- Shadow Scorpion
- Shadow Ant
- Mini-boss: Masi
- Mini-boss: Siphoo
Fire Room:
- Licanloap
- Fire Golem
- Mini-boss: Phumel
Electric Room:
Quests[]
- Collect the Holy Text (obtained after clearing Shadow Valley once)
Strategy[]
This dungeon is definitely one where you need to be prepared for what is to come. Be sure that every player in your party has enough fatigue points in case a player dies one too many times. Similar to the Wine Cellar dungeon, the mobs in this dungeon will respawn after roughly 10 minutes of being killed (this does not include Mini-bosses). Because of this, speed becomes a necessity when progressing through the dungeon. In the case that a player dies, they can reenter, but at the challenge of having to bypass the waves of mobs alone.
Poison Room (Masi and Siphoo):
Make sure the entire party is in the dungeon and ready before you take on the first wave of mobs. Eliminate the Shadow Scorpions and make your way to the poison floor. Collect the quest items and proceed to the platform before Masi. Be sure to not move into Masi's aggro range. Masi can move quickly and inflict a good amount of damage. Eliminate the scorpions surrounding him carefully to the point where you can safely fight against Masi. Be sure the party has inventory space upon defeating Masi to obtain the quest item. Proceed through the second poison floor leading to Shadow Ant mobs at the end, and also surrounding Siphoo. Use the same manner of strategy as Masi and eliminate Siphoo. Open the barrier from that point and move onto the Fire Room.
Fire Room (Phumel):
Rebuff if necessary before beginning this room. Due to there being no real form of jumping, there's not much of a challenge in this room other than the boss.
Electric Room (Ifrit and Gatekeeper):
FightingLele and finishing the dungeon:
Once the players cross the last platforms to Lele, you'll notice the limited space provided to fight on. Keep your distance without having Lele detect you. Lele can push you off of the edge or platform into the Electric Pit. The safest way to avoid that is by running to the left corner. When fighting Lele, make sure Lele is facing away from the Electric Pit. Have Priests focus on necessary healing. Strikers and Crashers should time use of their rushing skills (Shoulder Blow if learned, Leap Blow for Strikers, and Planet Fall for Crashers) in case they are almost pushed off or pushed away. Once Lele falls under 20%, be careful of the Damage Reflect skill. Stop all attacks for the time of the skill activation. Once it's over, finish off Lele and take the treasure. There is more after this point. The entire party should rest and recover their HP and MP before activating the lever that appears in front of them, similar to Ifrit. When the lever is pulled, Mummy of Blood skalari and gate barricades will surround the party. Eliminate the numbers quickly and proceed to the final room. Clear the Titan mobs and collect the 3 tablets to open the barrier. Take one last investigation of the statue behind the barrier and leave the dungeon by moving behind it.